Up to this point, I did already lay out all of the tidbits concerning the electricity, the I/O hardware units, even some custom software to provide an event-based API to address all of the various components in the overall system. The final fundamental piece to bring everything together is what I call the service layer, and specifically home assistant.
This post is a part of a larger series of posts on my home automation setup. See the home automation overview post, to learn about the rationale and a description of the other posts!
Architecture
To recap, have a look at this drawing from the earlier home automation architecture post.
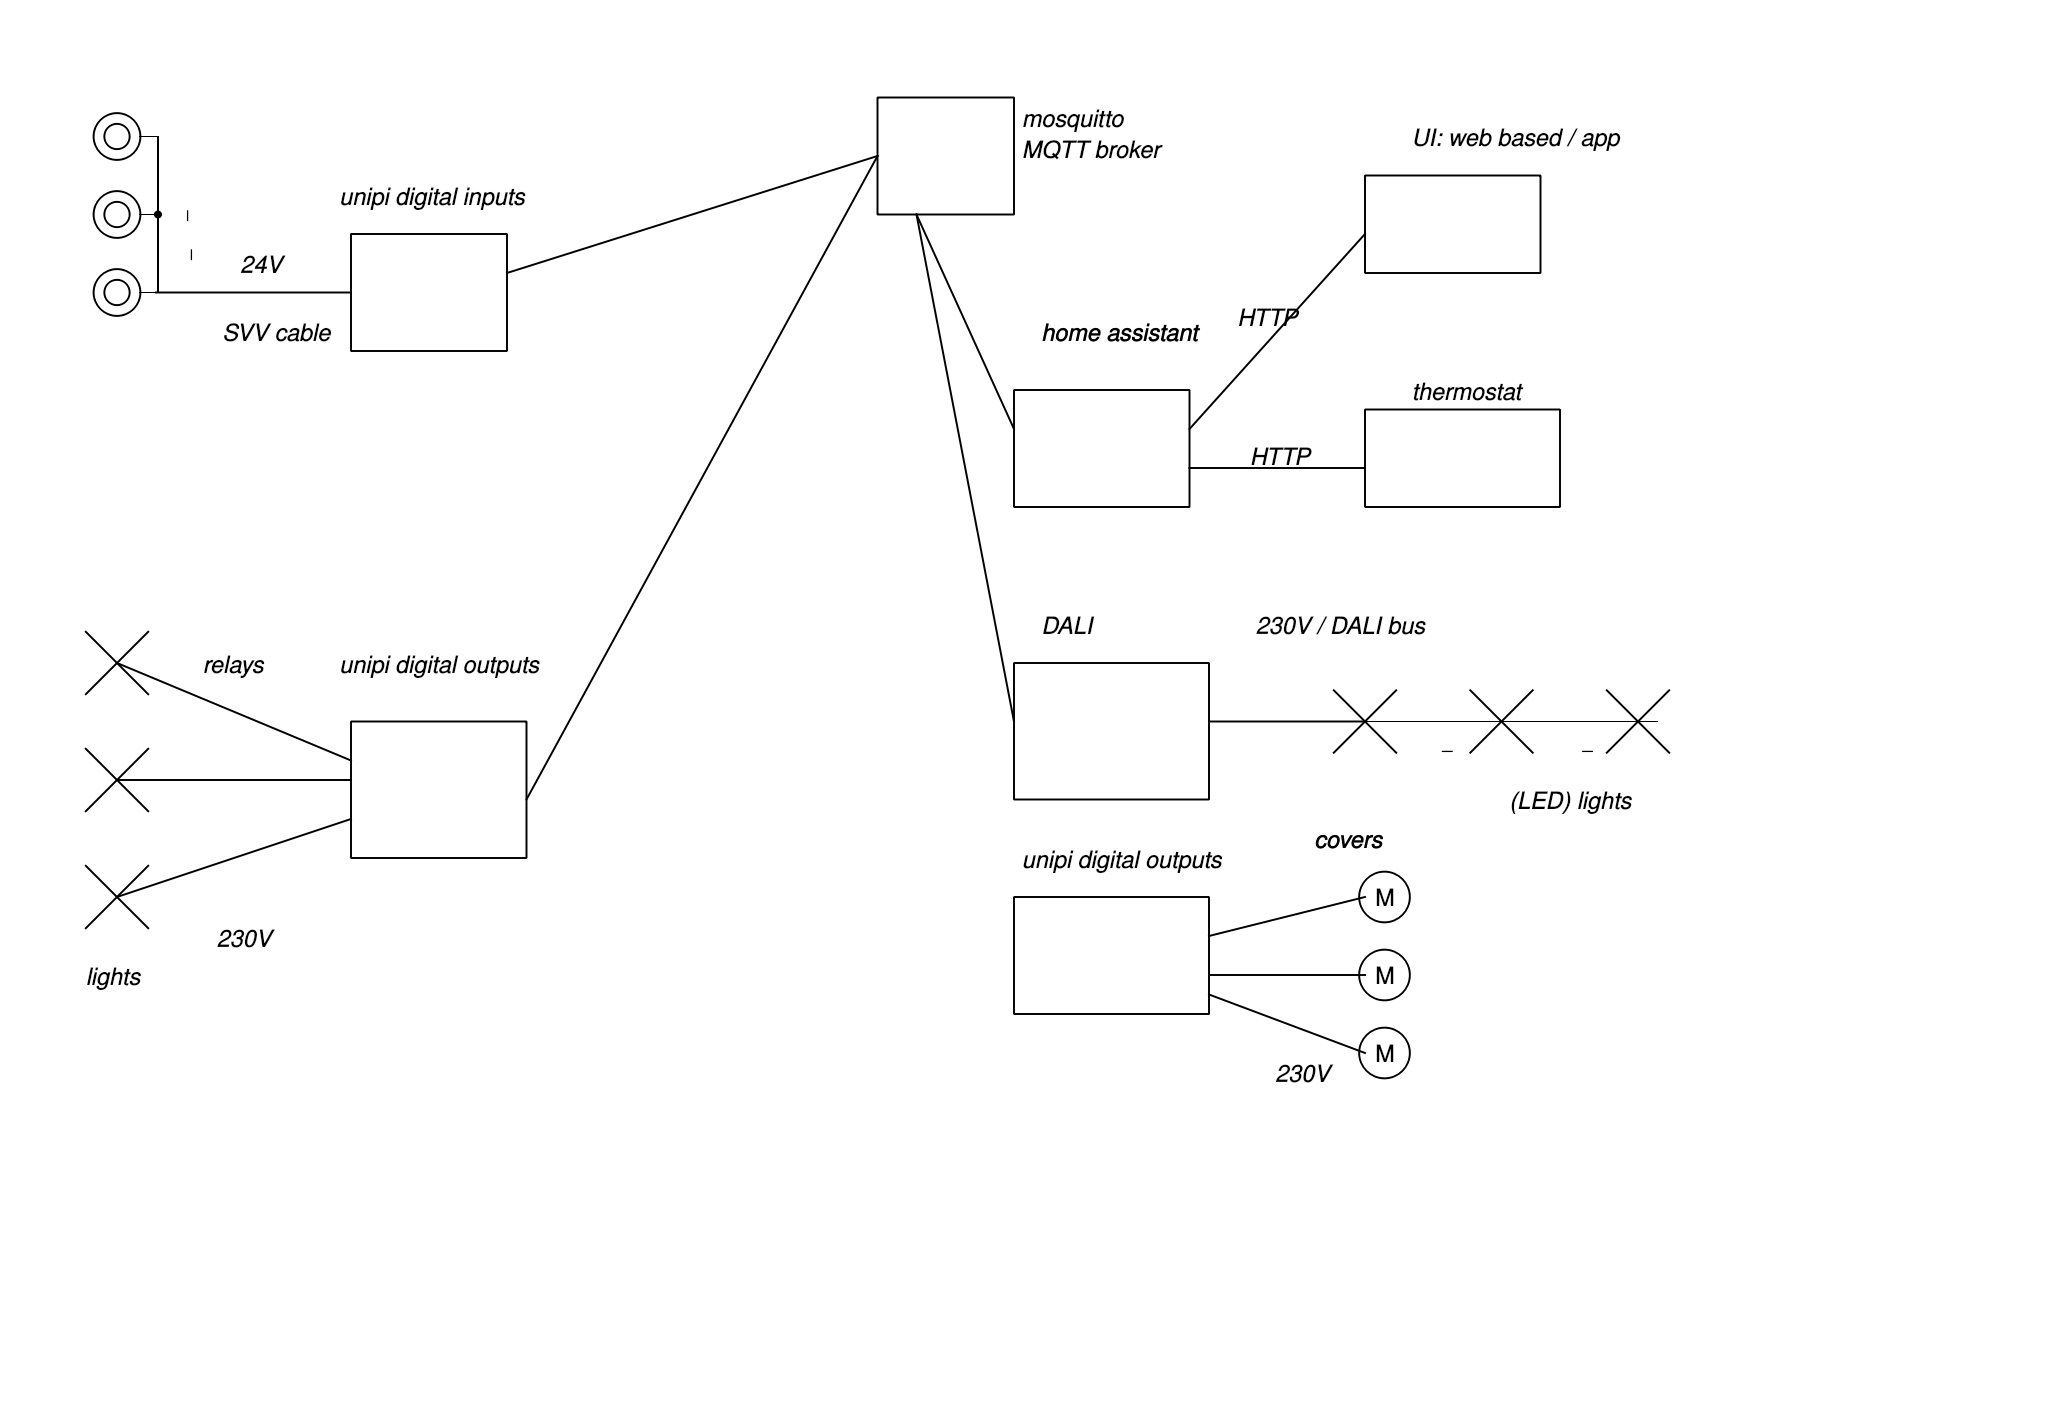
In summary:
- a central MQTT broker: this component takes in events on a topic from the various publishers and forwards them to any of the subscribers for that topic
- all the unipi units: can take in any MQTT event to handle as commands and pushes out events as state updates.
- home assistant: has logic to trigger specific events on other events incoming
Note that for this publish / subscribe system, all of the clients can (and will) function as both publisher and subscriber.
home assistant
I already did mention home assistant, but what is it really?
Home assistant is an open source software platform that was created with the vision of being able to integrate all sorts of IoT solutions.
It is bundled with a huge amount of integrations for various different vendors; check out the home assistant integrations page for an overview. The way the platform is structured is via a number of entities, e.g. a generic switch, light, etc … Each integration can then implement such entities. The home assistant community would typically encourage new contributors to put the interfacing logic (e.g. an API client) in its own, open source library, to be called from the custom integration. The added value of this approach is twofold:
- the community rapidly gets more of these open source libraries
- the home assistant installation only needs to pull in the source libraries it needs, instead of having of a big blob of code.
The advantage of running your own platform is that you are more in control of your own hardware, less reliant on cloud solutions.
Though not required, I did find it interesting to learn about more about the way home assistant itself is structured, check the home assistant architecture dev docs.
The integration I have been mostly using is home assistant MQTT integration. At this point, this means that all of the I/O that is provided by the unipi units via an MQTT interface can now be readily represented as entities directly in home assistant!
Scenario
Let’s make it more tangible by presenting the scenario from the home automation architecture post again, where a push button triggers a light.
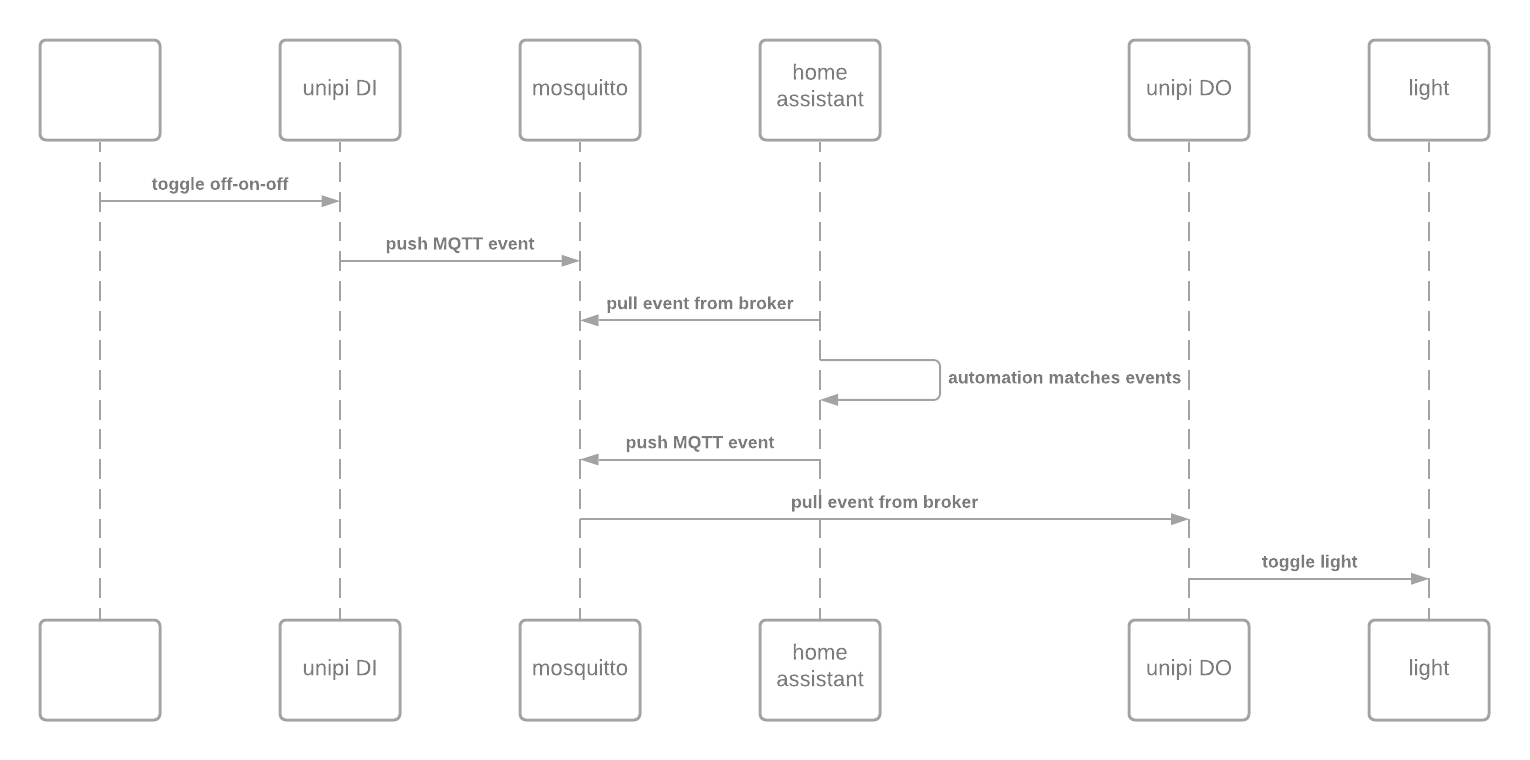
In terms of the home assistant MQTT integration, the notion of command and state topics are quite relevant:
- command topic: this is a specific MQTT topic, e.g.
/{device}/{io}/setwhich accepts and incoming command to update the I/O. This scenario is typically coming from home assistant to the IO module. - state topic: this topic is specific for reporting state updates back to any listeners, e.g.
/{device}/{io}/state. This is for the opposite scenario where the IO module itself updates its state back again to home assistant.
With this pair of topics for each entity, a typical flow combining command and state topics means:
- home assistant requesting a state update on the command topic of the IO module
- the IO module updates its value (e.g. toggles a relay for a light)
- the IO module sends out an update on the corresponding state topic
- home assistant then updates its matching entity according to the state topic
In relation to the flow diagram above:
- on the push of the button, an MQTT event is pushed out to the state topic
- the MQTT broker pushes the state update to home assistant
- home assistant updates the matching home assistant MQTT switch entity
- home assistant triggers an automation which connects a state update for the push button entity to a matching light entity
- to update the light entity, an event is published on that home assistant MQTT light entity
- the MQTT broker pushes the command to the subscribed I/O module
- the I/O module takes in the command to update its state and toggles the light accordingly
- after that, the I/O module triggers the relay, it pushes back an update on its state topic
- the MQTT broker forwards the state update again to home assistant
- home assistant sees the state update for that light entity and updates its internal state
Containers and services
Home assistant has multiple ways of installing and running the platform, see the home assistant installation page.
First of all, you should be aware that the overall platform consists of multiple layers and the meaning of each of those has changed over time. I would refer to the following diagram from the home assistant architecture dev docs.

- core: at the center, there’s the main home assistant software.
- supervisor: this component manages the core software, but it also has the capability to run other services besides home assistant, yet integrating them in a single UI
- operating system: the way I understand this, this is a minimal linux-based OS just to be able to run the supervisor for you. The idea is that at this level, you can just download a disk image, flash an SD-card and fire it up in a raspberry pi.
The core itself is actually a containerized version of the main home assistant software, which in turn is a python application. Check out the home assistant core docker container on docker hub. The rationale behind containerization is that you specify an image that contains an isolated environment for your application to run in. Containers are different from virtual machines in that multiple containers would share the same underlying OS kernel, which is better in terms of performance.
Containerization has become dominant in current-day software development and infrastructure management; I use it on a daily basis. A lot can be said on the topic of containerization and IT infrastructure, but I would like to keep this out of the discussion here. If you would be considering gaining more knowledge on this, before anything, understand that containers are there to support a particular model of software development, i.e. service-based development. This typically means stateless, web-based, services.
Apart from the container itself, you typically need something like a supervisor or container orchestrator to run the containers. The orchestrator is responsible for e.g. starting the containers, making sure the correct amount of containers are running at the same time (redundancy, scaling), moving containers between hosts (in a multi-node setup), resource allocation, external networking, …
As mentioned, home assistant has its own orchestrator; the supervisor. An orchestrator I often use for quick-and-dirty local development is docker-compose. The current de-facto industry standard is the google-backed kubernetes, abbreviated to k8s. The lightweight version of this is k3s. This probably not the end of the list, others like hashicorp nomad also exist.
All of these have their own merits and disadvantages:
| orchestrator | pros | cons |
|---|---|---|
| home assistant supervisor | built into the eco-system of home assistant | container orchestration is hard to do right, why roll your own? |
| allows extra functionality in the same UI | to me, this indicates a bad design, where a supervisor is responsible for more than what it’s intended | |
| supposedly more suited for embedded platforms (raspi 3) | low-memory footprint k8s alternatives exist, like the k3s mentioned before. | |
| docker-compose | simple syntax | only supports a subset of features |
| easy to get up an running | ||
| k8s | the de-facto standard | standard for web-based services and IT infrastructure management, might be overkill for IoT |
| a lot of features, e.g. zero-downtime deployments! | lots of concepts to grasp |
Over the course of time, I think I have actually ran home assistant in all of these configurations (even including directly from source). Like everything in IT, there is no real right or wrong solution, it depends on your specific situation. My current approach is based on k3s – but this is better left as the topic of a future post.
Sample setup
All of the theoretical babble about containers and orchestration is just to come to this point where I can actually show something to run.
For this sample setup, I will build part of the service layer using only docker-compose and a set of related home assistant configuration files.
The final folder structure will look like this:
├── automations.yaml
├── blueprints
│   ├── automation
│   │   └── homeassistant
│   │       ├── motion_light.yaml
│   │       └── notify_leaving_zone.yaml
│   └── script
│       └── homeassistant
│           └── confirmable_notification.yaml
├── configuration.yaml
├── deps
├── docker-compose.yaml
├── groups.yaml
├── home-assistant.log
├── scenes.yaml
├── scripts.yaml
├── secrets.yaml
├── tts
└── ui-lovelace.yaml
For those interested, have a look at hass.zip for all of the source files.
Most of these files were actually generated automatically when home assistant started the first time. The format for all of the most relevant files is YAML, which stands for “Yet Another Markup Language”. YAML is fairly widespread nowadays as a format for configuration files. To me, one of the most obvious advantages of the format is its conciseness and readability. Indentation matters though, so be sure you use a proper (plain text) editor when editing in this format.
I will go over the most important files in here:
docker-compose.yamlconfiguration.yamlui-lovelace.yaml
docker-compose.yaml
This the main file that will start all of the required containers.
version: "3.8"
services:
  homeassistant:
    image: homeassistant/home-assistant:2021.6.3
    ports:
      - "8123:8123"
    volumes:
      - .:/config
    links:
      - mosquitto
      - db
  mosquitto:
    image: eclipse-mosquitto:1.6.14
    ports:
      - "1883:1883"
  db:
    image: postgres:13.3-alpine
    environment:
      POSTGRES_DB: hass
      POSTGRES_USER: hass
      POSTGRES_PASSWORD: hass
    volumes:
      - hass-db:/var/lib/postgresql/data

volumes:
  hass-db:
This file defines 3 services, homeassistant (the main home assistant service), mosquitto (an MQTT broker) and db (a database – although this isn’t strictly required).
Some notes on the keys used in the configuration:
- ports: this is a mapping of the ports within the container to the outside world, e.g.
"8123:8123"means “maps the port 8123 inside the container to the host on port 812 “. Port 8123 is the port home assistant runs on by default. - volumes: this is mapping of the folder structure inside the container to the outside host. For the
homeassistantservice, this means to map the configuration folder to the location wheredocker-composeis executed. This also means it’s easy to put your own configuration inside the container this way. Volumes needn’t be mapped to an explicit host folder though, see the example for thedbservice where there’s just a named volume calledhass-db, managed by docker. - links: links take care of the networking between containers. A link from
homeassistanttomosquittomeans that the home assistant instance will be able to reach that other service with the namemosquitto.docker-composetakes care of creating the proper docker network for that. It also means that if thehomeassistantservice is started, the other 2 services are also automatically started.
At this point, you can actually already just fire up home assistant using docker-compose up!
$ docker-compose up
Starting hass_mosquitto_1 ... done
Starting hass_db_1        ... done
Starting hass_homeassistant_1 ... done
Attaching to hass_mosquitto_1, hass_db_1, hass_homeassistant_1
db_1             |
db_1             | PostgreSQL Database directory appears to contain a database; Skipping initialization
db_1             |
db_1             | 2021-06-10 19:19:56.893 UTC [1] LOG:  starting PostgreSQL 13.3 on x86_64-pc-linux-musl, compiled by gcc (Alpine 10.2.1_pre1) 10.2.1 20201203, 64-bit
db_1             | 2021-06-10 19:19:56.893 UTC [1] LOG:  listening on IPv4 address "0.0.0.0", port 5432
db_1             | 2021-06-10 19:19:56.893 UTC [1] LOG:  listening on IPv6 address "::", port 5432
db_1             | 2021-06-10 19:19:56.902 UTC [1] LOG:  listening on Unix socket "/var/run/postgresql/.s.PGSQL.5432"
db_1             | 2021-06-10 19:19:56.912 UTC [21] LOG:  database system was interrupted; last known up at 2021-06-08 20:37:13 UTC
mosquitto_1      | 1623352796: mosquitto version 1.6.14 starting
mosquitto_1      | 1623352796: Config loaded from /mosquitto/config/mosquitto.conf.
mosquitto_1      | 1623352796: Opening ipv4 listen socket on port 1883.
mosquitto_1      | 1623352796: Opening ipv6 listen socket on port 1883.
mosquitto_1      | 1623352796: mosquitto version 1.6.14 running
db_1             | 2021-06-10 19:19:57.219 UTC [21] LOG:  database system was not properly shut down; automatic recovery in progress
db_1             | 2021-06-10 19:19:57.227 UTC [21] LOG:  redo starts at 0/1920BF0
db_1             | 2021-06-10 19:19:57.231 UTC [21] LOG:  invalid record length at 0/1931478: wanted 24, got 0
db_1             | 2021-06-10 19:19:57.231 UTC [21] LOG:  redo done at 0/1931450
homeassistant_1  | [s6-init] making user provided files available at /var/run/s6/etc...exited 0.
db_1             | 2021-06-10 19:19:57.298 UTC [1] LOG:  database system is ready to accept connections
homeassistant_1  | [s6-init] ensuring user provided files have correct perms...exited 0.
homeassistant_1  | [fix-attrs.d] applying ownership & permissions fixes...
homeassistant_1  | [fix-attrs.d] done.
homeassistant_1  | [cont-init.d] executing container initialization scripts...
homeassistant_1  | [cont-init.d] udev.sh: executing...
homeassistant_1  | [cont-init.d] udev.sh: exited 0.
homeassistant_1  | [cont-init.d] done.
homeassistant_1  | [services.d] starting services
homeassistant_1  | [services.d] done.
This should actually have created the other configuration files for you.
configuration.yaml
The next file to discuss is the main home assistant configuration file.
Here is my final adapted version:
# Configure a default setup of Home Assistant (frontend, api, etc)
default_config:

# Text to speech
tts:
  - platform: google_translate

group: !include groups.yaml
script: !include scripts.yaml
scene: !include scenes.yaml

lovelace:
  mode: yaml

recorder:
  db_url: postgresql://hass:hass@db/hass

mqtt:
  broker: mosquitto

# Entities representing push buttons
switch:
  - platform: mqtt
    name: study room
    command_topic: tesla/input/2_01/set
    state_topic: tesla/input/2_01/state

# Entities representing lights
light:
  - platform: mqtt
    name: study room
    command_topic: edison/relay/2_05/set
    state_topic: edison/relay/2_05/state
    optimistic: true # only needed because of demo now

# Automation to link the two together
automation:
  - alias: Toggle study room
    trigger:
      platform: state
      entity_id: switch.study_room
      from: "off"
      to: "on"
    action:
      service: light.toggle
      entity_id: light.study_room
The top part of the file contains mostly boilerplate code that was added by homeassistant itself, e.g. the default_config and tts.
The group, script and scene blocks were also added automatically and use the !include keyword, which home assistant would interpret as including those other yaml files within this main configuration file.
When you have a large number of entities to add, this would be the typical way to structure them.
For the discussion here, I did not do that though.
The recorder part is about the home assistant database integration.
This contains the connection URL (including the credentials).
If you compare this again with the docker-compose.yaml file, you will see those credentials which were set from the environment key for the db postgres service.
In a proper setup, you’d use the secrets system, but as the database integration isn’t that important here, I did not do that.
The mqtt integration is quite relevant here.
This should point to your MQTT broker.
Checking docker-compose.yaml, this service was called mosquitto and should be reachable with just thus name from inside the docker container network1.
The following entry is a configuration for a push button using the home assistant MQTT switch integration. It minimally needs the integration platform, the name (which is relevant for later referring to the entity) and a command and state topic, the meaning of which was described earlier.
Next would be the matching light which we would like to have triggered whenever the push button is toggled, based on the home assistant MQTT light integration.
It also has the MQTT platform, name (which matches now, but needn’t really), command and state topic.
I also configured the light to be in optimistic mode.
This means the that the state of the light internally in home assistant is updated regardless of changes on the state topic.
I did this because this is a dummy setup and this light is not linked to an actual device that will acknowledge commands with a matching update on the state topic.
In my real setup, this is obviously omitted.
At this point, both push button and light are known to home assistant, but they are not linked. The automation takes care of that. The general outline of an home assistant automation is:
| trigger   | when the switch state changes |
| condition | and it's nighttime            |
| action    | then toggle the light         |
The condition part is optional for the automation, and for the example given here quite nonsensical indeed.
Important here is that we only allow toggles when the push buttons gets toggled from off to on, not the other way around – otherwise if would follow the push buttons state, which means the light would only be on for the duration the button is pressed.
The light.toggle is an action that is built-in to home assistant and does just take: if the light was off, it will turn it on, and vice versa.
Check the home assistant configuration for more extensive documentation and further links.
ui-lovelace.yaml
This file contains the visual outline for home assistant.
views:
  - title: Home
    icon: mdi:home
    cards:
      - type: entities
        title: Entities
        entities:
          - switch.study_room
          - light.study_room
          - automation.toggle_study_room
This just makes the demo a bit easier to look at.
Demo
Let’s see it in action!
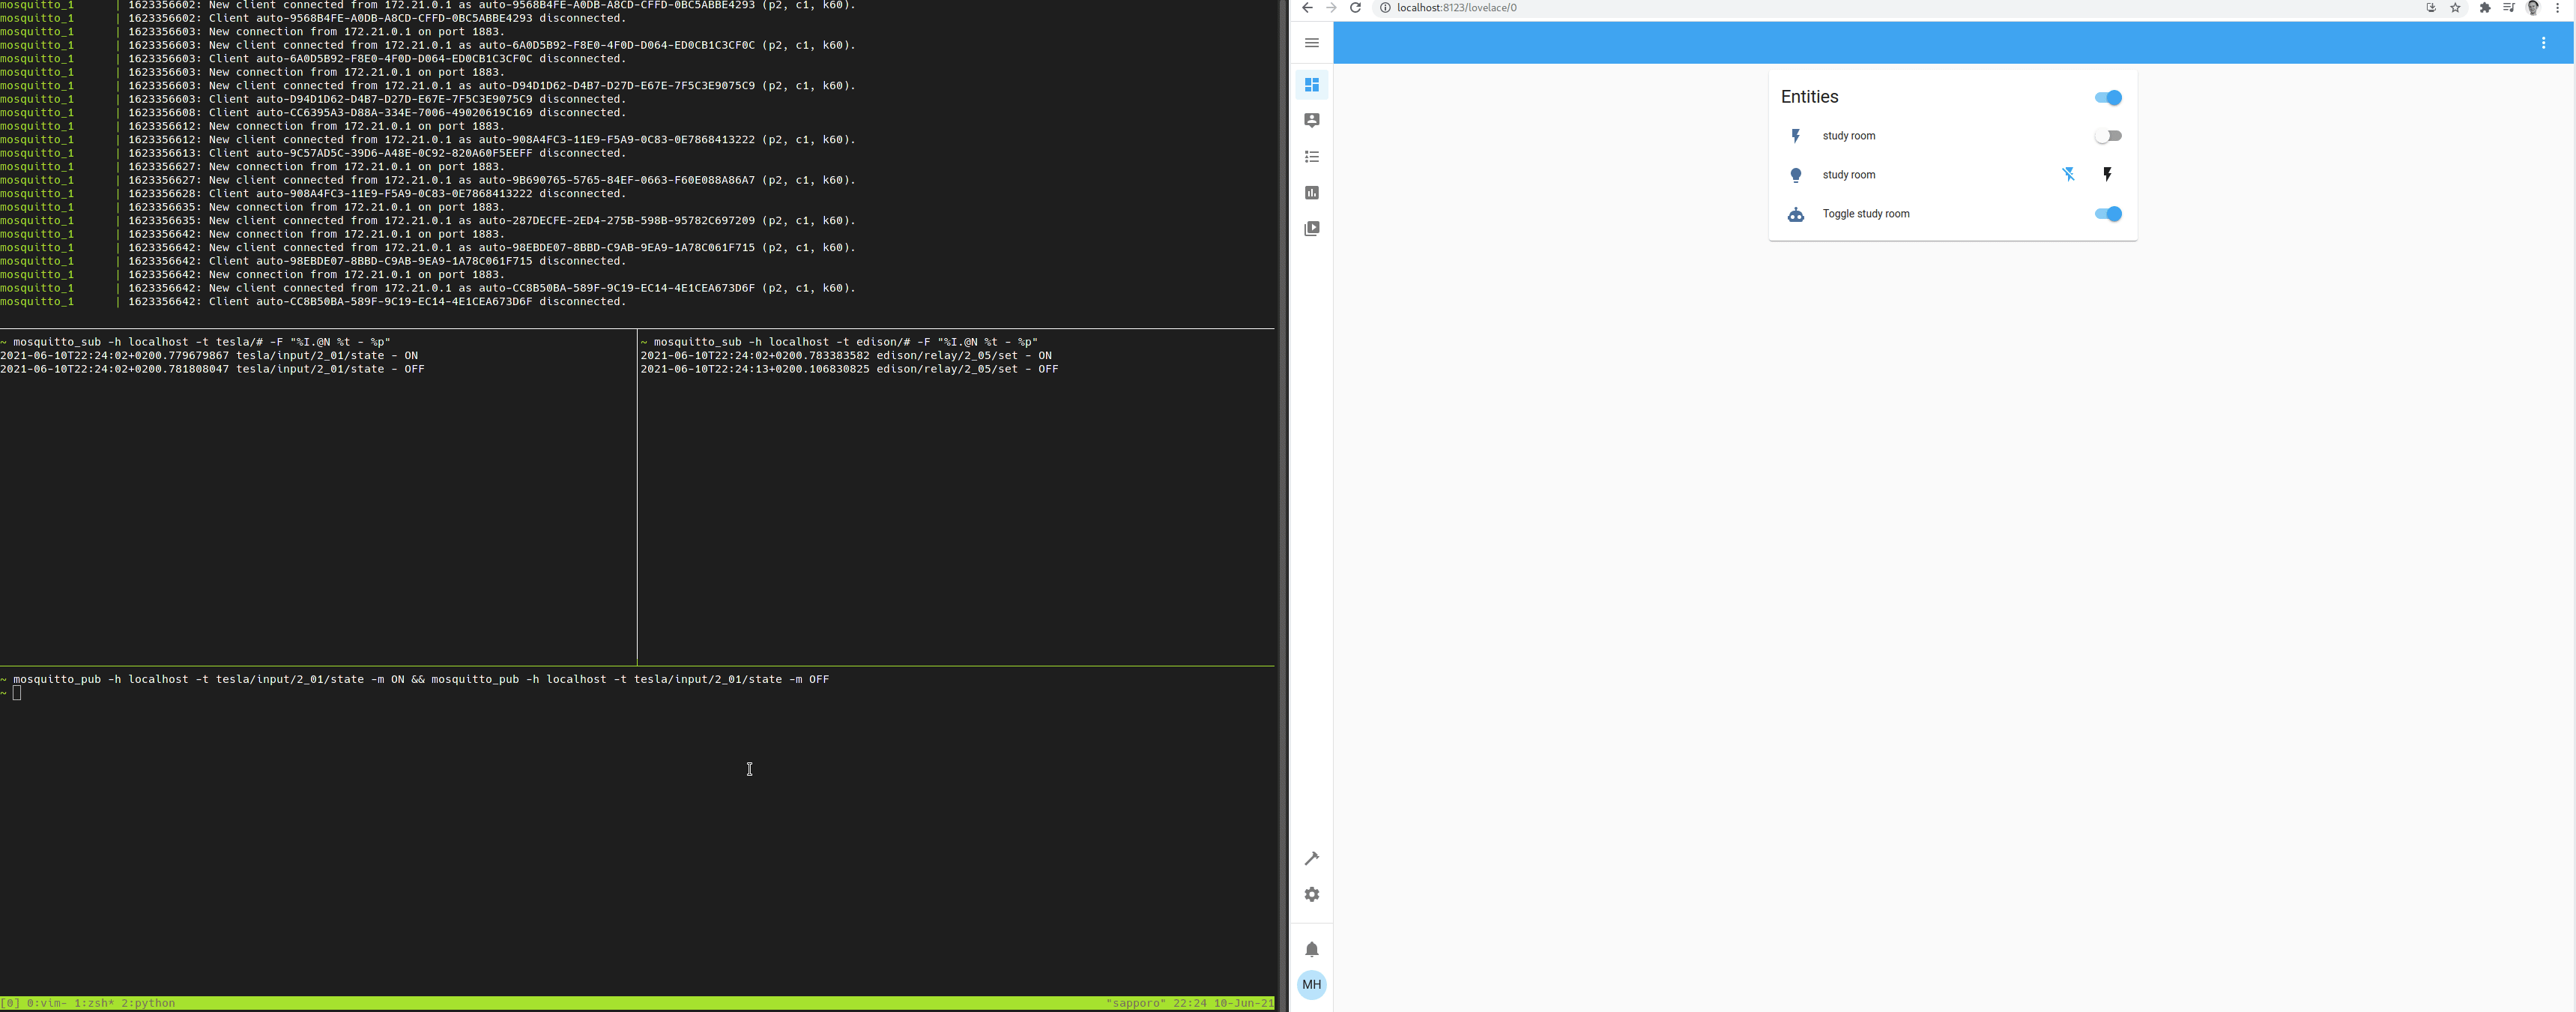
The top left terminal just shows the docker-compose output, containing the aggregated log output of the different services.
The right hand part shows the simplified home assistant UI, containing (top to bottom) the switch state, the light state and the automation.
The middle left terminal uses the mosquitto_sub tool to read all events from the broker; the left one subscribes to tesla/# meaning any topic below tesla/ (for the push button) and the right for edison/ (the light).
The bottom left terminal is used to simulate the push of a button by sending out events directly to the push button’s state topic, using another tool called mosquitto_pub
The commands themselves are:
mosquitto_pub -h localhost -t tesla/input/2_01/state -m ON
mosquitto_pub -h localhost -t tesla/input/2_01/state -m OFF
Each of the lines represent a push to host “h” localhost, on topic “t” tesla/input/2_01/state with message “m” ON or OFF.
By rapidly firing them off shortly after each other, this simulates the push of a button (first on, then off again).
When the push button state updates are pushed:
- home assistant updates the internal state of the push button entity
- the automation kicks in, and updates the matching light entity is toggled
- the light entity sends out the update on the command topic
Apart from controlling the light with the push button, it can also be controlled directly from home assistant; when toggling the light entity directly in home assistant, it just sends out the command on the MQTT topic directly.
Closing thoughts
This concludes my approach to using (abusing?) home assistant and the MQTT integration as the central part of my home automation setup.
I did use MQTT as the standard to centralize all my components on, have a look at the other posts presented in the home automation overview post of how to get there. Examples of other components that use MQTT in the same fashion are window contacts, PIR, smoke and water detectors, motorized blinds, etc.
The advantage of home assistant though is that it does not need to all be the same protocol, so it is quite easy to add other integrations in the mix as well. A notable example of this is an automation where I link one of these push buttons to a Philips Hue light; as far as home assistant is concerned, both of these are light entities.
A disadvantage of using home assistant this way and by extent the overall approach is the centralized nature of it.
Home assistant needs to be online all the time for everything to work.
Initially, I did run home assistant using docker-compose, which was quite stable.
However, doing updates was never fun, since it meant that one container needs to go down before the next comes up, leaving in a short (but stressful) period of downtime.
Using k3s as the supervisor certainly fixed that.
Given that the majority of my interfacing hardware is actually all on MQTT, I might at some point add another service in the mix that mimics the automation engine as a backup.
A similar argument can be made about the mosquitto broker.
Currently, I actually run that as a dedicated service on the host itself.
Alternative solutions such as emqx exist though, which would run MQTT in a high-availability mode (multiple, load balanced instances).
Currently though, the system works quite fine and everyone at home has gotten so accustomed to it, they only really notice when not being at home. The backlog of improvements and extra bells and whistles is still quite long, so I’ll hope to write more on this later!
the
mosquittoversion used in thedocker-compose.yamlversion was explicitly pinned to a version < 2.x, which did not enforce authentication, hence why the broker configuration just needs a host name to connect to. ↩︎