After connecting everything on the different “physical” layers, it is time to have a look at how to connect all on the software side of things. This post shall describe my current setup, specifically the different software components and the protocols they rely on for the unipi hardware.
This post is a part of a larger series of posts on my home automation setup. See the home automation overview post, to learn about the rationale and a description of the other posts!
Particularly relevant is the hardware post, since I my software builds on the unipi neuron platform.
Software
The following diagram shows the different software layers, going from the kernel which polls the IO-boards to eventually pushing out / pulling in MQTT events.
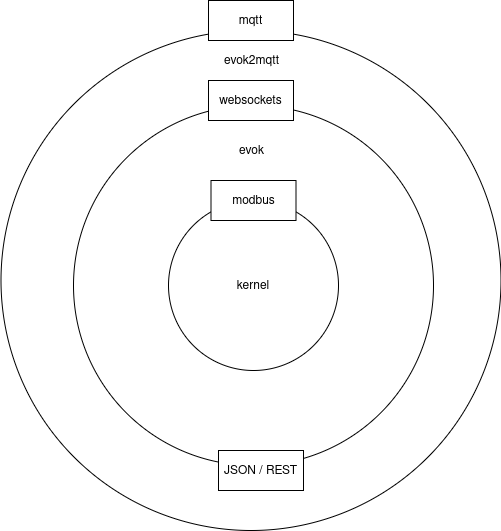
Kernel: polling SPI
Unipi provides their own neuron open source OS, which is a modified version of raspbian including custom kernel drivers to poll the I/O boards over SPI. The kernel driver makes the data available via the modbus protocol. The modbus protocol is a widely accepted, open industry standard for interfacing with PLCs. I believe you would typically use it in a setup where you have one main controller and a series of follower controllers - which is pretty much the situation you would have using SPI. Note that the unipi units also have an RS-485 connection, commonly used for daisy chaining multiple controllers.
Apart from the modbus interface, unipi also provides a sysfs interface, which essentially maps the I/O states and controls to a number of files in a fixed file system structure. I have used this sysfs interface in another project, unipitt, but since I am currently not using this one, I will not discuss this further.
Evok: modbus to web APIs
Unipi also provides an open source library called evok that will periodically poll the underlying modbus interface and make it available via all sorts of common web API formats and protocols: JSON / REST, JSONRPC, SOAP, … See the evok API docs for an extensive overview of all possible interfaces.
The most interesting interface provided by evok is the evok websockets interface, since this is the only interface that can also trigger actions for particular events. This is a definite requirement here, since you’d need to be able toggle the relays fast in case of an incoming request.
For the receiving of messages (I/O board → outside) you would need to register a number of callback functions to the websocket. The arguments to the callback function then hold information about the specific I/O action that triggered them. For the sending of messages (outside → I/O board), you can just send a structured message directly.
Here’s a python snippet directly taken from the evok websockets interface docs:
import json

import websocket

url = "ws://your.unipi.ip.address/ws"


def on_message(ws, message):
    obj = json.loads(message)
    dev = obj["dev"]
    circuit = obj["circuit"]
    value = obj["value"]
    print(message)


def on_error(ws, error):
    print(error)


def on_close(ws):
    print("Connection closed")


# receiving messages
ws = websocket.WebSocketApp(
    url,
    on_message=on_message,
    on_error=on_error,
    on_close=on_close,
)
ws.run_forever()

# sending messages
ws = websocket.WebSocket()
ws.connect(url)
ws.send('{"cmd":"set","dev":"relay","circuit":"3","value":"1"}')
ws.close()
evok2mqtt: websocket to MQTT
The final layer is to translate the websocket “events” from and to MQTT events.
This translation is required since this is the standard message-based system interface that was chosen to interface with home assistant.
In order to implement this, I did create a small application called evok2mqtt.
The application is written in python3 and uses the websockets library for interfacing with the evok websocket and paho-mqtt to do the same thing for MQTT.
This application runs alongside evok on the unipi neuron itself.
Note that the application could in theory also run elsewhere on the network as the websocket and the MQTT broker can just be addressed over the network.
Given that the program itself was actually quite simple and fun to write, I will outline how it works with some example code snippets.
To express actions that need to occur on the receiving of messages, the MQTT library works pretty similar to the websockets library using callback functions, see e.g. this evok2mqtt on_message snippet
def on_message(client, userdata, message):
    """Callback for MQTT events"""
    logger.info(
        f"Incoming MQTT message for topic {message.topic} with payload {message.payload}",
        extra={"kind": LOG_KIND.MQTT},
    )
    match = MQTT_COMMAND_TOPIC_REGEX.match(message.topic)
    if match is None:
        return

    device_name = match.group("device_name")
    dev = match.group("dev")
    circuit = match.group("circuit")
    if device_name != _settings().DEVICE_NAME:
        logger.warning(
            "Handling incoming message for device %s, expected %s",
            device_name,
            _settings().DEVICE_NAME,
            extra={"kind": LOG_KIND.MQTT},
        )

    # Update state topic
    client.publish(
        MQTT_TOPIC_FORMAT.format(
            device_name=device_name,
            dev=dev,
            circuit=circuit,
            hass_action=HASS_ACTION.STATE,
        ),
        message.payload,
    )

    # Send to websocket
    value = 1 if message.payload == _settings().MQTT_PAYLOAD_ON else 0
    logger.info(
        f"Push to output {dev}, {circuit}, {value}", extra={"kind": LOG_KIND.WEBSOCKET}
    )
    asyncio.run(_ws_trigger(dev, circuit, value))
This snippet essentially details all actions that occur for incoming events from the MQTT broker (originating from home assistant):
- the message is logged
- the message topic is checked to ensure whether we should process this message further1
- the state of the I/O is updated to acknowledge to home assistant that the update went OK
- a call is issued to the websocket to do the update on the I/O
For the opposite action, a websocket event that needs to be translated to MQTT, a similar callback function is implemented.
async def _ws_loop():
    """Main loop polling incoming events from websockets"""
    logger.info(
        "Connecting to %s",
        _settings().WEBSOCKET_URI,
        extra={"kind": LOG_KIND.WEBSOCKET},
    )
    async with websockets.connect(_settings().WEBSOCKET_URI) as websocket:
        while True:
            payload = await websocket.recv()
            await _ws_process(payload)
This snippet sets up the websocket loop that will continually check the websocket for newly incoming messages. Note that this uses and async-await on the websocket, a feature provided in python>3.5’s asyncio library. The key thing to understand about asyncio here is that even though this is an infinite loop, during the waiting times for new data to come in from the websocket (or more generally, during the waiting time for any I/O), the thread scheduler can yield control to another thread to execute concurrently.
The function _ws_process that processes the incoming payload is next:
async def _ws_process(payload):
    """Process incoming websocket payload, push to MQTT"""
    obj = json.loads(payload)[0]
    logger.debug(
        "Incoming message for websocket %s", obj, extra={"kind": LOG_KIND.WEBSOCKET}
    )

    topic = MQTT_TOPIC_FORMAT.format(
        device_name=_settings().DEVICE_NAME,
        dev=obj["dev"],
        circuit=obj["circuit"],
        hass_action=HASS_ACTION.STATE,
    )
    payload = (
        _settings().MQTT_PAYLOAD_ON
        if obj["value"] == 1
        else _settings().MQTT_PAYLOAD_OFF
    )
    _mqtt_client().publish(topic, payload=payload)
    logger.info(
        "MQTT publish %s to topic %s",
        payload,
        topic,
        extra={"kind": LOG_KIND.WEBSOCKET},
    )
The operations it does, are quite straightforward:
- load the object representation from the incoming payload (as JSON).
- construct the MQTT topic based on the object name and circuit.
- construct the MQTT payload from the object payload
- publish the MQTT payload to the topic
There you have it: translation from-and-to websockets / MQTT. Note that this translation covers both inputs (push buttons) as well as outputs (relays).
Closing thoughts
At this point, with all of these layers of software in between, the unipi neuron unit provides a standard MQTT-based interface to home assistant.
The main downside I’ve felt at this point is that the reaction speed from the evok interface is sometimes a bit too slow to react quickly enough to push button toggles.
On rare occasions, this can result in push buttons events being missed – which most of the times can be easily fixed by pushing the buttons a bit longer.
Also, having multiple of these translation layers makes the overall solution a bit more complex and will surely also add to the latency.
I do intend at some point to have another look at this setup. One option is to look at the (open source) implementation of evok and replace the async parts there with the more modern asyncio library. However, if performance is key, I will more likely have a look again at the sysfs interface and my unipitt project, which uses golang under the hood.
Nonetheless, this current setup has been working quite OK for me thus far.
Update from unipi
A while after this post went live, I did get some friendly feedback on my unipi forum post.
Some selected parts of the notes I think I should share2:
evok might get an update, including MQTT support!
The Evok is planned (well, maybe “wished” is a better word:)) to be rewritten to Python 3 and to a multi-threaded application. Along with that, major changes to the API will happen. We will abandon some of the less used APIs (RPC and SOAP probably) and definitely add native MQTT support since it is a driving force in the industry.
Missed state changes should be possible to detect with the digital input counter:
The missed state changes of the DI can be detected by checking the state of the DI counter. The counter is implemented in the HW and can count as fast as 10kHz signals.
The low-level communication I did outline using SPI and modbus is slightly different from what I did present above:
And a bit of explanation of the low level communication:
- The HW boards are connected over SPI
- The protocol on the SPI level is modified ModbusRTU
- The Unipi kernel module (part of the
unipi-kernel-modulespackage) exposes this communication channel as/dev/unipispi device- The Unipi ModbusTCP server (part of the
unipi-modbus-tools) exposes this as a ModbusTCP server running on TCP/502- The rest is correct. Evok polls the ModbusTCP server as fast as it can. And creates a “system image” of the HW state.
The IO boards might also get a firmware-level upgrade!
And in the firmware of the IOs we plan to introduce a “latching” state of the DIs. Those will be registers and coils which will hold the leading edge of the DIs until they are read from the software. That will prevent the losing of the edge altogether.
I really appreciate this kind of feedback from the unipi team. It is nice to see how they are continuously improving their product (e.g. the idea of including native MQTT support). More importantly, I think this company really understands well the value of their product as an open platform and is actively working on community-building. Like I did mention in some of my earlier posts in this series, this openness is one of the reasons I am really glad about their products!