Prior to actually building anything, it is important to think on a higher level what the various components are and how they will interact with each other, i.e. the architecture. Over the process of doing my own setup, I came across a large number of different possible configurations, each with their own benefits and downsides. For the first part of this post, I will focus on the final layout.
While discussing the architecture, it is important to realize there are a number of different layers of abstraction to reason about these. This will be the topic of the second part of this post.
To make everything more tangible, I did add a third section detailing toggling a light with push button.
This post is a part of a larger series of posts on my home automation setup. See the home automation overview post, to learn about the rationale and a description of the other posts.
Architecture
The following diagram gives an high-level overview of the overall architecture.
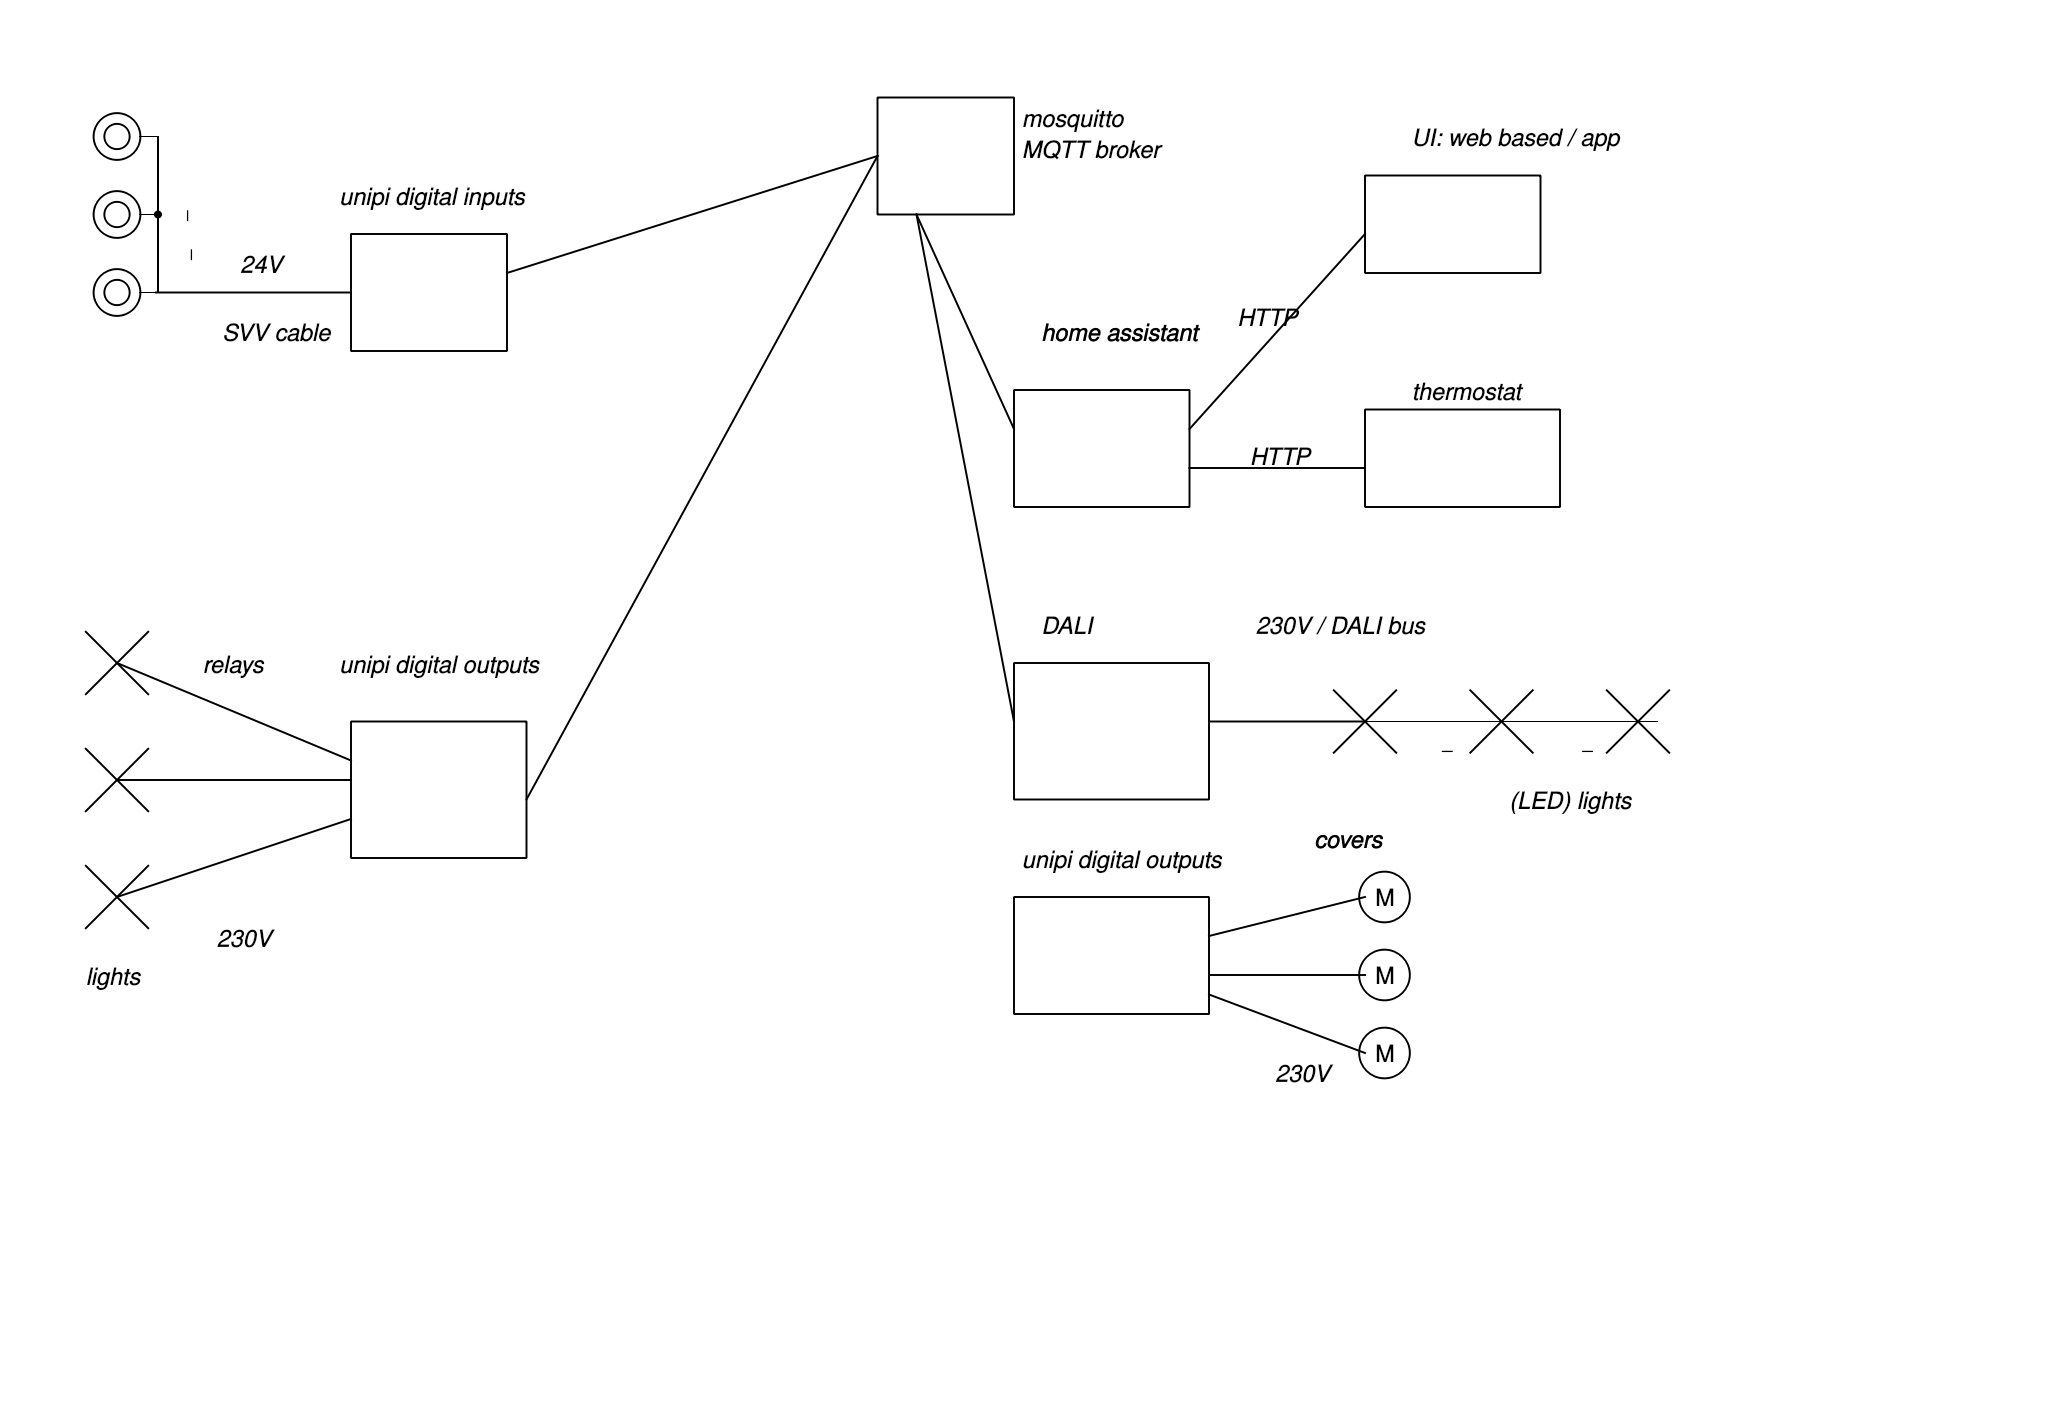
Its main characteristics are:
- distributed communication:
- communication is (mostly) done via an event-based system, MQTT
- centralized wiring:
- all I/O (push buttons, relays for lights, …) is connected to modules which fit in a centralized electric cabinet
- there is a central service with automations connecting the different modules (home assistant)
Let’s elaborate a bit more on the constituent components.
MQTT broker
In the center of the drawing is a mosquitto MQTT broker. MQTT is a publish-subscribe protocol:
- there is one central instance, called the broker, which manages different topics
- different clients can publish updates, called events, to the topics
- in addition, all clients can also subscribe to topics to receive the events
MQTT is a popular choice for IoT since its event-based model fits well for a lot of problems (e.g. a push button toggle). Another advantage is that the each of the different clients only needs to maintain a connection to the broker and the topics they want to be subscribed to. This makes for a very loosely coupled and scalable architecture: it is quite easy to add new components. A disadvantage however is that all connections rely on the availability of the central broker.1
MQTT clients
The principal other components of the setup are all MQTT clients which both subscribe and publish to specified topics, specifically:
- subscribe: they listen to topics which instruct them to do some behavior (“command topics”)
- publish: they publish events to topics that indicates their state (“state topics”)
The clients in this setup can provide (a combination of):
- sensors: push buttons, motion sensors, smoke detectors, …
- actors: lights, covers, sirens, …
- logic: send out events on a certain condition, e.g. on another event (an automation)
unipi
For the sensors and actors I did use hardware from unipi. In essence the unipi neuron units are DIN-rail mountable units housing a raspberry pi and a couple of I/O boards depending on the model you have. The role of the unipi units is thus to provide an MQTT event-based interface for all home automation I/O: reading push buttons, toggling lights, controlling shades, reading smoke and movement detectors, etc.
home assistant
Whereas the I/O modules themselves are distributed both physically and logically, I did want to centralize the controlling logic in a dedicated service. Cue in home assistant.
home assistant is an open source software project which aims to integrate all sorts of smart home devices. Given my choice of MQTT as an interfacing protocol throughout my setup, I heavily rely on the home assistant MQTT integration.
From a high level, all sensors and actors which are available as MQTT topics can be represented as entities within the home assistant configuration. The home assistant instance itself connects to the central MQTT broker and listens to those MQTT topics for which it has entities. Automations, which are also part of the configuration, can then link actions from one entity to another. An obvious example is the push of a button that switches a light on. The rationale behind using automations to link inputs with outputs, is that nothing is really hard-wired in this setup!
Note that home assistant supports a wide range of integrations beyond MQTT. The thermostat in the schematic for instance has an integration based on REST / HTTP.
Layers of abstraction
Planning for a DIY wired open home automation setup requires some other specific thinking in terms of the different layers of abstraction. The following diagram focuses on these different layers.
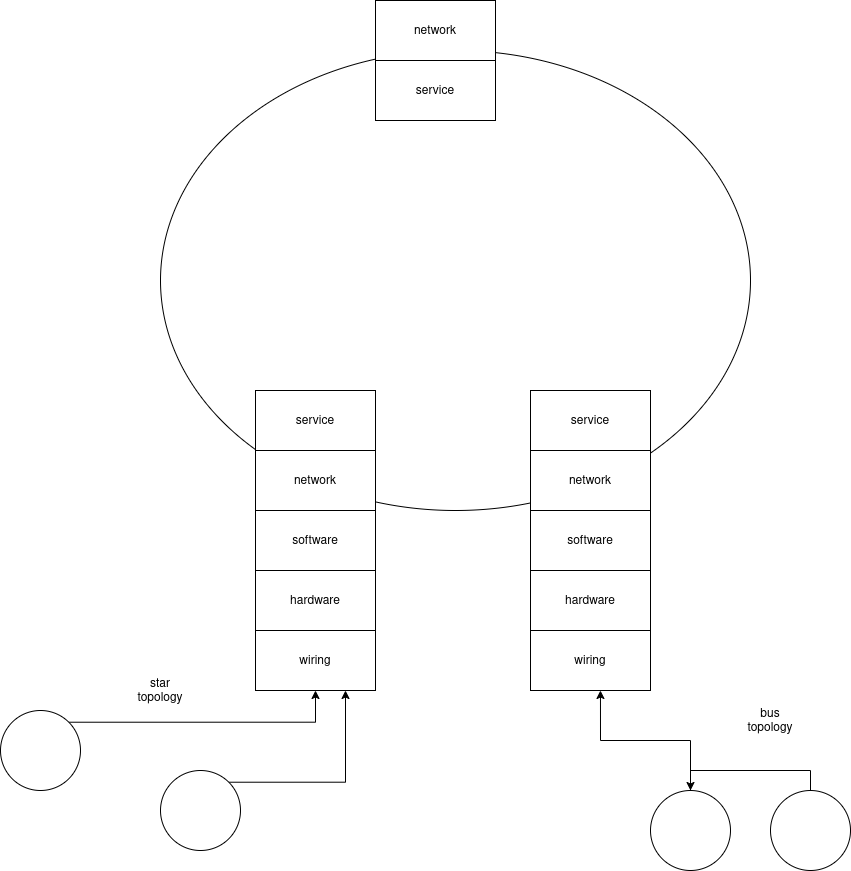
From low to high level:
- wiring: the physical wiring which connects to electrical components such as push buttons and light fixtures
- hardware: the physical hardware component that will interface with the electrical components (I/O).
- software: a client library interfacing with the hardware and which can translate low-level hardware events to protocol events
- network: layer which connects the different components together using the protocols
- service: the services are those parts which actually talk to each other over the network
Notice that not all components need to have all of the layers. Services like home assistant and the mosquitto broker act completely on the network itself.
Why does this matter? For the majority of commercially available IoT devices, you would get something that takes care of most of the lower levels. Wiring mostly isn’t an issue (it is typically wireless) and the hardware and software are part of the package that you buy. In this wired layout with custom components however, all of these layers need to be addressed.
As an example, have a look at the wiring I did for my cover control:
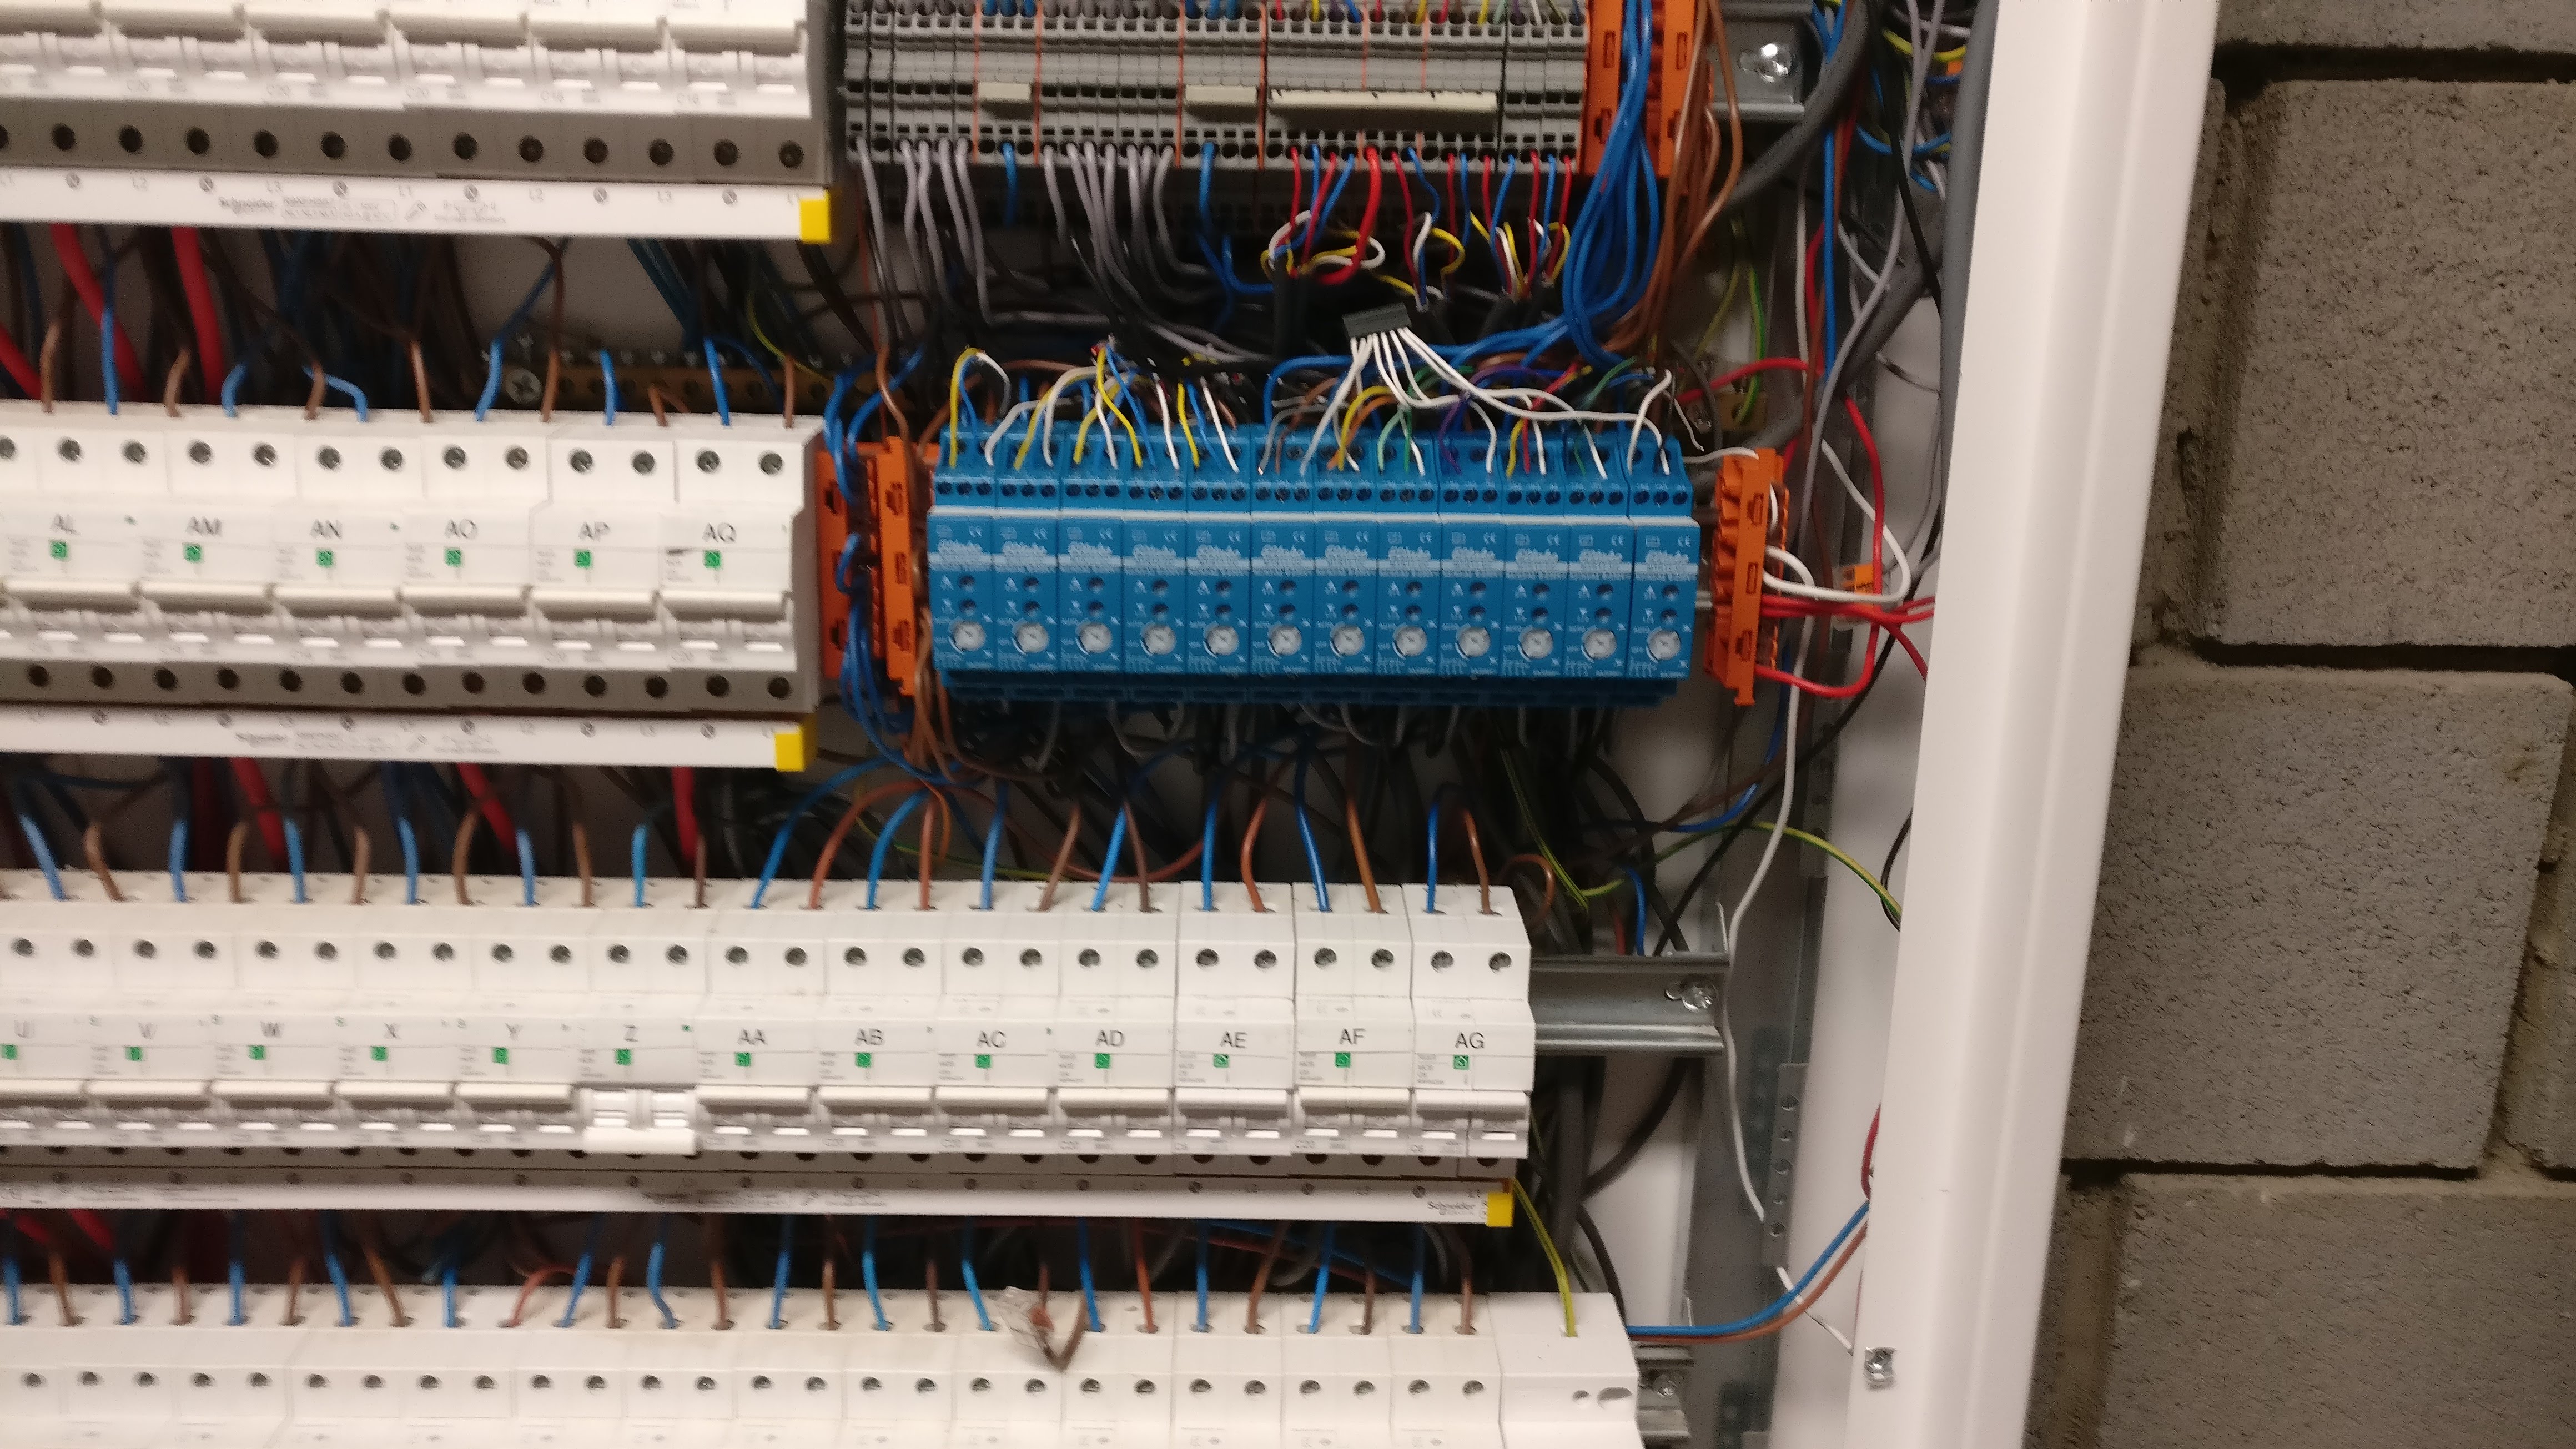
Most of my wiring was done in a star topology. This means for example that you do need a single cable run for each of the individual (group of) lights you want to control. The upside is that this is very flexible towards the future, since physical rewiring is still possible from the electrical cabinet. The (visible) downside is that the amount of wires piles up rapidly and you will need to think of some kind of system to keep a sane overview of this.
Bus-based systems
Alternatively, the wiring could have been done with a bus-based system like KNX or DALI. The advantage of systems like these is that the wiring would have been a lot easier and they can also provide some of the functionalities on other parts of the stack. For the case of KNX for instance, each of the components (push buttons, light control, …) are provisioned individually, resulting in a fully distributed, more fault-tolerant system. Note that there is a home assistant KNX integration, so even in this case, it could fit the proposed architecture (but obviously less reliant on MQTT).
At this point, I did not choose for a bus-based system though. The first reason was one of cost, notably in the case of KNX. Also, I did want the possibility to easily (re)program my setup using general purpose programming languages, whereas KNX relies on (costly, vendor-restricted) visual programming tools. All of my light sockets are wired with 5-wire cable, so at some point I might have another look at using DALI for controlling my lights.
Toggling a light switch …
To illustrate the theory, let’s just walk through all the steps of toggling a push button:
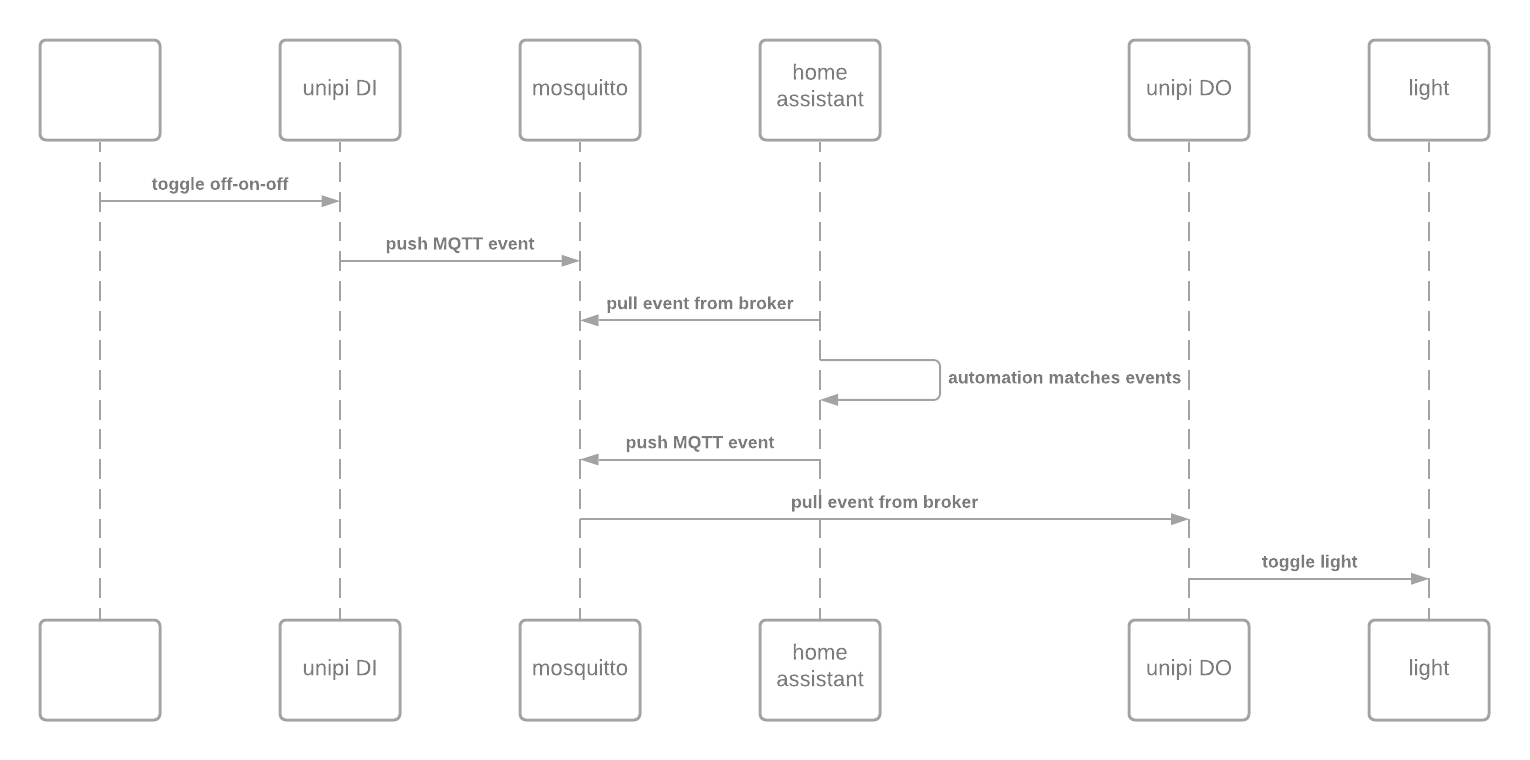
- a push button is pushed down, making contact (off-on) and then released again (on-off)
- the unipi digital input unit sees this change and translates this to an MQTT state change event which is pushed to the central mosquitto broker
- the home assistant instance has a subscription on the broker for the input button state change and updates its internal entity state
- the home assistant instance has an automation configured for the push button entity and triggers the matching light entity to an action
- the light entity update pushes out another event to the light action topic to turn on
- another unipi unit which is connected to the physical light and has a subscription to the light action topic pulls in the update
- the unipi unit toggles a relay, switching on the light
- finally, after the light has turned on, a state update is also pushed out from the unipi unit, which updates the internal state on home assistant
Closing thoughts
The focus of this post was to outline the main components and links in my home automation setup, principally based on MQTT and home assistant as the brains behind it all.
The main advantage of this setup is the flexibility if offers since everything is configurable from within home assistant. On the other side of the equation, once home assistant breaks down, the entire system can break down, which poses high reliability constraints on such central components.
I did not yet dive down into the details of the different components i.e. the sensors and actuators, most notably the unipi platform. Also, the different applications themselves, such as push buttons, lighting fixtures, DALI, shades, an alarm system, … all merit their own discussion. Finally, I did also point the different layers of abstraction to consider when laying out a wired home automation system.
This should conclude the “theoretical” part of the home automation series. Check the home automation overview post for the more “practical” upcoming posts.